Campaign Overview
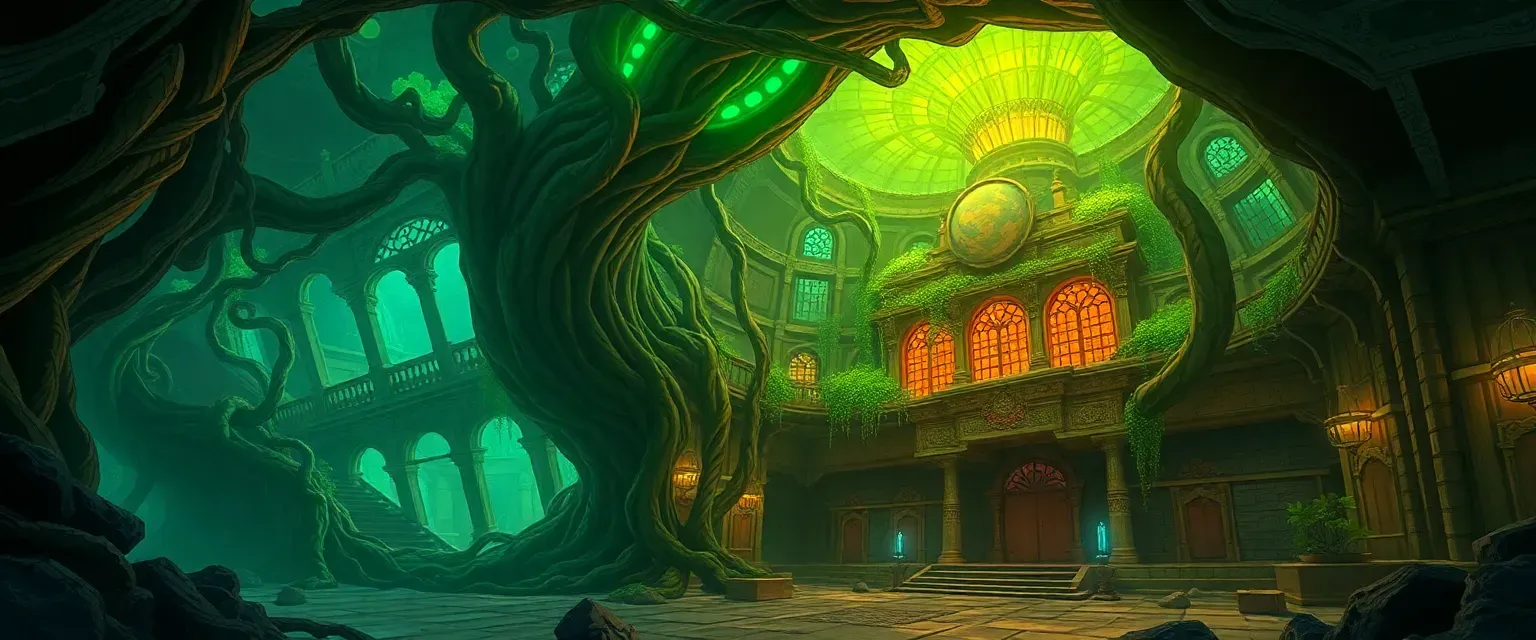
Beneath the surface of the Aurelthorne Valleys sleeps a sleeping god: the devoured Garden God reborn as the Verdant Maw. This subterranean leviathan drifts silently beneath human kingdoms, devouring villages, gardens, and kingdoms whole. A doomsday cult, Bloom’s Blessing, heralds the Maw’s emergence as divine rebirth, seeding sigils in palace courtyards and sacrificing innocents to its heart. In response, the Iron Orchard Company, a coalition of mercenary alchemists and engineers, hires brave adventurers to sow alchemical salt deep in corrupted soils. Players begin in the shattered Blossom Cathedral, racing to reassemble the shattered Sun Globe that can push back invasive roots.
Their journey weaves through five harrowing quests in the valley, from rescuing kidnapped daughters in bone-caked swamps to forging uneasy alliances with photosynthetic elves and talking fungi in bioluminescent catacombs. Here, dwarven runes lead to the legendary Alabaster Forge, where sap-lava flows beneath the earth, offering both hope and peril. The players must pilot ramshackle sap-powered drillships through root-clogged tunnels, planting salt charges while fending off fungal riders and hallucinogenic spores. Along the way, they recover fragments of the Garden God’s memory, negotiate with a telepathic root-heart, and rescue elven and dwarven spirits bound by ancient curses.
Deep in the Maw’s Chlorophyll Heart, adventurers confront the ultimate moral crucible: bargain with the god-seed consciousness for immortality, unending spring, or ultimate power—or banish it forever at the cost of flesh, memory, or dreams. Their choices ripple across the realms: do they sacrifice the innocent to save humanity, or trust in nature’s balance to prevail?
The campaign emphasizes exploration, diplomacy, and high-stakes moral dilemmas. Rotten temples, root-limbed guardians, and psychic assaults test each player’s mettle. Ten unique magic items—from the Prism Globe of Daylight to the staff of Verdant Banishment—guide the party toward victory. Three factions, each with conflicting goals, pressure the adventurers: a zealous cult, a merciless corporation, and ancient elves.
In this epic of vines and blood, players shape the fate of kingdoms and the very earth itself. The Verdant Maw Rising invites heroes to delve into root-choked caverns, parley with dream-weaving fungi, and decide the destiny of a god reborn. Will they sow salt or spring? The land’s rebirth—or its final bloom—rests in their hands.
Prepare for a journey beneath the soil, where the pulse of an ancient god awaits your touch.
Starting Location
Aurelthorne Valleys
Secrets
- A smuggler’s tunnel beneath Torrentbend Watchtower leads directly to Bloom’s Blessing caches.
- Beneath Blossom Cathedral’s crypt, an ancient reliquary houses one prism shard of the Sun Globe.
- Marrow Glade’s root-heart whispers the true name of the Garden God when offered humanoid blood.
Key Locations
Blossom Cathedral
Rising from a terraced hill, the Blossom Cathedral is a grand structure carved from ivory marble and adorned with living vines fed by subterranean springs. Its lofty spire reaches skyward, crowned with a glass globe of perpetual sunshine—or at least it did until Bloom’s Blessing cultists shattered it. Now the spire glows dimly with unholy bioluminescence from seeded sigils, and the once-harmonious gardens crawling up the walls have turned carnivorous, snapping at any intruder. Interior halls are lined with stained glass depicting the Garden God’s benevolence; half the panes are broken, the floor slick with gelatinous green goo. In the crypt below, alchemical labs funnel salt-charged soil into waiting silos. The cathedral’s priests have fled or gone mad, replaced by robed zealots chanting beneath a dripping altar of roots.
Additional Notes
Cultists use the cathedral as a planting ground and lab. DM: The central globe can be restored to drive back blight if players locate three missing prism shards in side-quest ruins.
Torrentbend Watchtower
Perched on a rocky promontory where the Silverflow River swerves inward, Torrentbend Watchtower commands a view of miles of farmland. The stone tower’s base is encased in creeping roots that have pried the mortar loose, and one battlement has collapsed into the river below. From its crenellated top, armed lookouts once scanned for root-beasts; now, only one nervous sentinel remains, peering over water stained with green algae and drifting spores. A broken drawbridge hangs like a ruined jaw, and within, wooden floors sag from dampness. Makeshift traps—pits filled with alchemical salt and sharpened stakes—line the entryway. Guards ration sour bread and water, mumbling that reinforcements never came. Rumors speak of a hidden lower gallery leading into an old smugglers’ tunnel beneath the riverbank, now overrun by thorn chimera spawned from the Maw’s edge.
Additional Notes
Secret smugglers’ tunnel contains Bloom’s Blessing recruits laundering supplies. DM: Place an outrigger boat in the submerged tunnel for a dramatic rescue.
Faelind’s Glasshouse
A glass-domed greenhouse built by local alchemists, Faelind’s Glasshouse once produced fabled azure blossoms used in healing elixirs. Now its shards lie everywhere, and inside, vines have mutated into translucent tendrils that drip luminescent nectar. Heated by alchemical burners, the air is warm and heavy with pollen that induces vivid hallucinations. Statues of dryads carved in obsidian leer from smashed planters. Every surface is a living fungus-house, and corridors twist through thick hanging moss. Hidden between collapsed frames is Faelind’s secret study: journals detail experiments to mutate crops for salt immunity—research lost if not reclaimed. Several puzzling runes line the walls, unlocking secret greenhouse chambers filled with exotic seeds and a dormant clockwork golem.
Additional Notes
Journal pages hint at a cipher. DM: The golem activates if players solve a riddle inscribed beneath a rotten blossom.
Marrow Glade
A circular clearing in a copse of oak and ash, the Marrow Glade is named for its white-bone encrusted soil. Hunters who tracked maw-spawn here found nothing but trophies arranged around a giant, writhing root that pulses like a heart. When starlight filters through the canopy, veins in the root glow crimson, and ghostly wails drift across the moss. Surrounding trees have hollowed trunks crammed with seed-pods that sprout hallucinogenic spores. Elves speak of the glade as a corrupted burial ground, defiling ancestors with living roots. Deep underfoot, catacombs tunnel toward the Maw’s core—but no one dares follow. Local myths say that offering flesh in the center will still the wails, but those who try often vanish for weeks, returning half-mad with plant-flesh growing in their hair.
Additional Notes
A hidden root-chamber holds tokens of sacrifice. DM: Root heart can speak telepathically once players place an offering.
Elmscar Fallow
Once a fenced pasture for prized draft horses, Elmscar Fallow is now a swamp of stinking water and sprouting vines. Moss-coated saddles drift in muck, tethered to rotting posts. At night, the water glows an eerie green where bioluminescent plankton flourish on dumped sigil-seeds. Deeper areas form quicksand-like bogs; desperate villagers chained an alchemical barrel of salt to a maw-spawn here, causing it to writhe and die in a violent explosion, which opened a cavity full of ruined equipment and a sealed wagon containing rare alchemical samples. The Fallow’s fence posts bear carvings warning away travelers, but those skilled in Nature can follow faint hoofprints leading into sunken seepage tunnels.
Additional Notes
Buried wagon contains Iron Orchard prototypes. DM: Barrel may still leak salt, affecting root-creatures in encounter.
Bioluminescent Catacombs
Secrets
- Secret dwarf tunnels bypass fungal swamps to reach the forge’s core.
- The mushroom pillars at Myconid Ark hide crystallized spores that can grant telepathy briefly.
- Echoing Shrine’s reliquary holds a phased blueprint only visible under Moonbeam light.
Key Locations
Myconid Ark
A vaulted chamber decorated with luminescent fungal pillars, the Myconid Ark serves as a meeting place for fungi-folk. Bioluminescent caps cluster overhead like chandeliers, dripping amber spores into shallow pools. Massive shelf mushrooms form amphitheater-like tiers where an elder Myconid Council deliberates. Their society thrives by consuming root-hair clusters delivered from the Maw’s fringe. Elven emissaries trade pollen-wine for fungal knowledge, hoping to discover biological repellents. The Ark’s floor is etched with glyphs showing the fungus lifecycle; scholars believe these form a key to curing crop blight above. Tree-root collars tether four massive fungal leviathans in a central pit—creatures that can crush intruders if provoked. Myconid sentries communicate telepathically, so deceptive spells risk instant hostility.
Additional Notes
DM: Players may bargain with spores for intel at a cost—minor hallucinations.
Echoing Shrine
An ancient dwarven shrine carved into a natural alcove, its walls are etched with gardens of metal vines and leaf-forged weapons. Lichen-covered cenotaphs hold offerings of crystalized honey and bronze seed pods. The floor shows a deep fissure where a raging root sprout broke through centuries ago. Beneath the shift lies a hidden reliquary containing dwarven blueprints for the Alabaster Forge’s anvil apparatus. However, a bound limestone sentinel—shaped like a hammer-wielding golem—guards the reliquary, waking only when seismic magic or iron salt is detected. Crumbling steps lead to a collapsed crypt filled with marrow-seeded husks of dwarven smiths.
Additional Notes
DM: Golem’s core is vulnerable to sonic damage from Dawnshard trumpet found in a side quest.
Alabaster Forge
At the catacombs’ intersection, a cavern of white crystalline walls houses a glowing magma spring. The Alabaster Forge’s hearth is fueled by sap-lava—an azure fluid that drips from root breaches in the ceiling. Ancient dwarven machinery stands half-buried: giant arms for hammering alloy, tongs attached to root-limbed vines, and channels directing sap-lava through forged molds. Cultists from Bloom’s Blessing use the forge to create ‘Seed Sponsors’—crystal bombs that can accelerate the Maw’s growth. Piloting sap-powered drillships here requires rerouting sap flows through dwarf-made valves and infusing salt charges into the molten sap to temper its corrosive nature. The roar of dripping sap echoes like a heartbeat; each pulse can knock adventurers off balance.
Additional Notes
DM: A broken valve puzzle must be solved (DC 16 Intelligence) to safely pierce sap flows without cave in.
Chlorophyll Heart of the Maw
Secrets
- A hidden tunnel beneath the altar leads back to surface—an escape route the cult keeps secret.
- The Heart’s memory shard can animate a sap-construct companion if the right phrase is spoken.
- A dormant guardian lies behind a rune-locked door; freeing it can aid in final conflict.
Key Locations
Sacrificial Dais
An altar of petrified roots entwined with human remains, the Sacrificial Dais stands atop a raised platform. Cultists carve flesh-signs into root-lingered bones to appease the Heart’s hunger. When offerings are placed, pulsations in the ground shift to a rhythmic drumbeat. Hidden underneath the altar is a root-wrapped journal of the Maw’s final prophecy, containing cryptic instructions for halting its migration—if read aloud precisely.
Additional Notes
DM: The journal is written in ancient druidic; deciphering requires DC 18 Intelligence (History).
Drillship Docking Bay
A cavern blasted open with arcane explosives, filled with half-assembled sap-powered drillship hulls and tangled scaffolding. Crews left hastily, leaving crates of alchemical salt and experimental steam pumps. The bay is unstable: any loud noise or vine movement can trigger a roof collapse. A secret hatch at the base of a sap-silo leads to a flooded maintenance tunnel where cult zealots store stolen relics from palace courtyards.
Additional Notes
DM: Breached pipe vents can be rigged to create a sap steam cloud as cover.
Pulsing Root Nexus
At the chamber’s core lies the Pulseling Root Nexus, a writhing mass of luminous veins pulsating with the Garden God’s residual will. Touching the Nexus risks a mental bond: visions of the god’s birth, its devouring rage, and whispered bargains. Those unwilling to pay its price must succeed on a DC 17 Wisdom save or become enthralled, serving as new sacrificial seeds. A ring of glowing runes around the Nexus can be disrupted by a correct sequence of salt-infused crystals gleaned from Iron Orchard salvage.
Additional Notes
DM: If players attempt to bargain, present moral dilemmas: give up memories, limbs, or companions.
NPCs in Aurelthorne Valleys
High Priestess Aralyn Zeeborne
An aging human cleric of the Garden God, her once-golden robes are now stained green. She hides in Blossom Cathedral’s ruined vestibule, torn between duty and despair.
Ser Dorith Valance
Commander of Torrentbend’s last watchman, embittered by lost reinforcements. He distrusts outsiders but yearns for pacts to save his men.
Faelind the Botanist
A halfling alchemist obsessed with restoring her glasshouse’s azure flowers. She wields a volatile salt-elixir bomb.
Liora Swiftbough
A photosynthetic elf ranger, sworn to protect survivors. She scouts the valley by day, sleeps in spiderproof cages by night.
Old Man Tristane
A bearded farmer hiding in Elmscar Fallow’s reed huts. Keeps a secret barter trade with cultists to save his daughter.
Dendron the Whisperer
A mysterious druid who communes with root-beasts. He appears as a traveling minstrel but can charm plant life.
NPCs in Bioluminescent Catacombs
Elder Shroommaw
A towering Myconid Sovereign crowned with ten-foot mushroom flanges. Speaks through spores and demands reciprocity.
Runesmith Vorgrim
A stoic dwarven smith bound to serve the Forge’s magic. His spirit lingers in rune carvings.
Silra Moonshard
An elven scholar mapping catacomb glyphs. She’s asthmatic, uses spores to breathe underground.
Cultist Forgemaster Rhazal
A zealot twisted by sap-lava exposure, wielding a crystalline seed bomb.
NPCs in Chlorophyll Heart of the Maw
High Cultist Eryx Thornbite
A charismatic half-elf zealot who believes the Maw’s rebirth will heal the world. He wields a thorned whip dripping with sap venom.
Commander Isla Blackwater
Head engineer of the Iron Orchard Company’s drillship party. Jaded by failures, she’ll support poisoning the Heart but fears sabotage.
Mycarn the Bound
A stone and root elemental bound to the Nexus ring. It can be freed to fight for the party, then dissolves into fertile soil.
Whispering Core
The god-seed consciousness incarnate—a voice without body. It offers triple-layered bargains in exchange for flesh, memory, or dreams.
Factions
Bloom’s Blessing
Goals
- Accelerate the Maw’s spread.
- Convert surface kingdoms to worship root divinity.
- Sabotage Iron Orchard Company’s salt campaigns.
Relationships
With Other Factions
Hates Iron Orchard for poisoning the soil; at war of dogma with photosynthetic elves. Some dwarven factions oppose them for defiling ancestral shrines.With Players
Often antagonistic; some members infiltrate party camps. Occasional parley possible if players show weakness.Iron Orchard Company
Goals
- Contain and poison the Verdant Maw’s roots.
- Secure contracts with regional lords.
- Research a permanent anti-root agent.
Relationships
With Other Factions
Tense alliance with humans of Aurelthorne; distrust from elves and Myconids for using harsh chemicals. They’re in an arms race with Bloom’s Blessing.With Players
Primary quest sponsors; reward explorers. Can be double-edged—some officers prioritize profit over lives.Photosynthetic Elves of Lysanth
Goals
- Negotiate safe zones.
- Research biological repellent to root blight.
- Preserve genetic diversity of forest flora.
Relationships
With Other Factions
Sympathetic to Myconids, hostile to Bloom’s Blessing. Distrust Iron Orchard’s chemical methods but tolerate them temporarily.With Players
Offer guidance and unique magic. Membership requires proving respect for nature in side quests.Main Questline
Rooted Dawn
Given by: High Priestess Aralyn Zeeborne
Goals
• Recover all three shards. • Restore the Sun Globe. • Survive the cathedral’s root surge escape.Reward
- Prism Globe of Daylight
- 300 gp
- Cathedral Favor
Secrets
- Cultists can intercept one shard shipment if party delays.
- Shards hum when near the Maw’s subterranean paths.
DM Notes
Emphasize sense of urgency; each day without the Globe extends root spread.Salt of Salvation
Given by: Ser Dorith Valance
Goals
• Defend the caravan. • Ignite salt charges at each well. • Unmask the driver if possible.Reward
- Iron Orchard Medallion
- 2 Potions of Extra-Salt Armor
Secrets
- Driver is a cultist double agent.
- One well houses a secret cache of alchemical prototypes.
DM Notes
Introduce fungal rider tactics; encourage area control.Catacomb Convergence
Given by: Silra Moonshard
Goals
• Broker peace in the Myconid Ark. • Finish valve puzzle. • Secure drillship hull component.Reward
- Elven Charms of Binding
- Blueprint Component for Drillship
- Fungal Ally Summon scroll
Secrets
- Forge elite cultists guard the valve key.
- A secret tutorial rune grants plus one to all forge checks.
DM Notes
Focus on roleplay and alliance-building; allow multiple resolution paths.Siege of Sap
Given by: Commander Isla Blackwater
Goals
• Pilot drillships through three tunnel checkpoints. • Defend against spore infester boarding parties. • Trigger salt breach at last checkpoint.Reward
- Access to final assault
- +2 drillship operation checks
Secrets
- Cultists smuggled seed bombs aboard drillships.
- Sap-engine residue yields a truth serum if distilled.
DM Notes
Use chase and siege mechanics; keep tension high.Heart of the Garden
Given by: Whispering Core
Goals
• Defeat or parley with Eryx Thornbite. • Perform the banishment or binding ritual. • Escape as tunnels collapse.Reward
- God-Seed Sash or Staff of Verdant Banishment or Null-Bloom Codex
- Titles based on decision
Secrets
- Secret rout to surface in the sacrificial dais.
- The Heart can spawn a sap-construct ally if shown mercy.
DM Notes
Offer moral dilemma; track party alignment shifts.Side Quests in Aurelthorne Valleys
Reclaim the Sapphire Prisms
Given by: High Priestess Aralyn Zeeborne
Goals
• Locate the first prism in the exploded silo beneath Torrentbend. • Solve the riddle in Faelind’s study to unlock the clockwork golem. • Survive the Marrow Glade root-heart’s telepathy trap. • Return all three shards to Blossom Cathedral.Reward
- 300 gp
- Prism Globe of Daylight (casts Daylight once per dawn)
- Reputation boost with the Cathedral
Secrets
- A cult spy in Torquebend Watchtower knows a hidden side entrance.
- One shard is magnetically sealed inside a root-heart bone cavity.
DM Notes
Scale root-beast encounters up if party uses fire magic—roots adapt quickly.Salted Earth
Given by: Ser Dorith Valance
Goals
• Defend the caravan from fungal rider ambushes. • Place and ignite salt charges at each well. • Protect the driver from rogue militia sympathizers.Reward
- Iron Orchard Medallion (access to alchemical supplies)
- 2 Potions of Extra-Salt Armor (grants resistance to plant-based damage)
- +1 Favor with Iron Orchard Company
Secrets
- The caravan’s crates include a hidden compartment with cult-poisoned salt.
- Driver is secretly a Bloom’s Blessing initiate.
DM Notes
Use water hazards to advantage but watch for boggy ground.Secrets of the Glasshouse
Given by: Faelind the Botanist
Goals
• Navigate Elmscar Fallow’s bog tunnels. • Bypass Bloom’s Blessing traps and free the golem. • Collect viable sun-lotus sample and deliver it safely.Reward
- Elixir of Bloomborne Health (heals 4d8 hp and prevents plant-based infection)
- Faelind’s Golem as a one-time combat ally
- Blueprint for Sun-Lotus cultivation
Secrets
- A hidden vial in the golem’s chest contains the Garden God’s bloodseed.
- Cultists plan to use sun-lotus extract to empower root-beasts.
DM Notes
Use Wisdom (Survival) checks to avoid quicksand and hallucination traps.Echoes in the Roots
Given by: Liora Swiftbough
Goals
• Subdue or calm thorn chimera and root-entanglers. • Perform the mourning rite (DC 15 Performance or Religion). • Decode map fragment to reveal next journey leg.Reward
- Elven Charms of Binding (grant +2 on saves vs. fear and charm)
- Ancient Cavern Map fragment
- Elven healers share herbal poultices
Secrets
- Cavern walls are inscribed with the Garden God’s original prayers.
- The altar holds a sealed elven wine flask rumored to unlock green speech.
DM Notes
Encourage nonviolence; spirits reward diplomacy over force.Tryst at Dusk
Given by: Old Man Tristane
Goals
• Bypass or disable vine traps (DC 14 Dexterity). • Defeat or negotiate with the zealot high-priestess. • Free the kidnapped daughter and escape the crypt.Reward
- Tristane’s Heirloom Blade (+1 longsword, deals extra 1d6 damage vs. plant creatures)
- Key to Bloom’s Blessing sigil seed vault
- Psychological advantage: rescued daughter provides insider gossip
Secrets
- The high-priestess possesses a bone-whistle that calls root swarms.
- The crypt’s eastern wall hides a narrow escape tunnel.
DM Notes
Toxic spores cause Constitution save DC 12 or become poisoned for 1d4 hours.Side Quests in Bioluminescent Catacombs
Spores of the Deep
Given by: Silra Moonshard
Goals
• Play the correct melody (DC 15 Performance). • Harvest spores without alerting guardians. • Deliver samples to Silra.Reward
- 5 doses of Biolume Smoke Grenade
- Temporary fungal ally in catacomb encounters
Secrets
- An elder spore sample glows silver—grants telepathy one minute.
DM Notes
Allow creative musical rolls; partial success yields fewer spores.Hammerfall Ghosts
Given by: Runesmith Vorgrim
Goals
• Salvage three anvil fragments. • Reassemble fragments at shrine altar. • Banish Vorgrim’s spirit respectfully.Reward
- Ethereal Hammer of Vorgrim (Spectral +1 hammer lasting three rounds)
- Blueprint of secret hinge mechanism
Secrets
- Hammer form can open hidden door to a salt chamber.
- Vorgrim’s burial spot is booby-trapped.
DM Notes
Track carrying weight; encourage party to craft pulley.Sapfall Calibration
Given by: Cultist Forgemaster Rhazal (undercover tip)
Goals
• Infiltrate forge floor under cover of darkness. • Disable or reverse three flow valves. • Evade or neutralize forge guards.Reward
- Key to Forge’s Main Valve
- Insight on seed-bomb detonation codes
Secrets
- One valve controls the lava pressure burst that can seal the entire cavern.
- Rhazal’s lab contains experimental sap-blood elixirs.
DM Notes
Use stealth and poison-coated arrow tactics.Side Quests in Chlorophyll Heart of the Maw
Shards of the God-Seed
Given by: Whispering Core
Goals
• Defeat traps and guardians at each fragment location. • Solve druidic glyph sequence on the dais. • Complete assembly to hear the prophecy.Reward
- God-Seed Sash (grants advantage on Wisdom saves vs. psychic effects)
- Final prophecy revealing banishment rite
- Unique titles/grants access to endgame choices
Secrets
- One fragment is buried inside a cultist’s chest cavity.
- Fragments must be assembled in a precise order matching druidic glyphs.
DM Notes
Introduce time pressure: each fragment awakened accelerates the Maw’s pulse.Steam-Pump Diversion
Given by: Commander Isla Blackwater
Goals
• Salvage pump parts under threat of collapsing tunnels. • Calibrate and deploy the pump at the dais. • Survive partial steam blast mishaps.Reward
- Masterwork Steam-Pump (usable once in final battle)
- +2 to next Alchemical Salt Bomb rolls
Secrets
- Oozes carry rare glass shards usable as arcane focus.
- Chimera hides a schematic map of pump piping.
DM Notes
Offer players custom failure results; allow creative engineering attempts.Encounters
Fungal Rider Ambush
MediumSuggested Level: 3–5
Creatures
- 4 Fungal Riders
- 8 Myconid Spoorlings
Terrain Features
A broken stone bridge over a shallow stream; fungal pods line the banks, exploding on impact.
Treasure
10 gp, Fungal Spore Vials (x3)
DM Notes
Scale riders’ mounts’ HP if party brings fire magic.
Root-Beast Cavern
HardSuggested Level: 4–6
Creatures
- 1 Two-Headed Root Beast
- 3 Vine Blights
Terrain Features
Low ceiling with dripping sap; sections of floor crack under weight.
Treasure
Alchemical Salt Flask, 50 gp
DM Notes
Beasts adapt: if players use bludgeoning, increase vine damage resistance.
Hallucinogenic Hall
MediumSuggested Level: 2–4
Creatures
- 2 Spore Myconids
- 1 Cultist Fungus Sage
Terrain Features
Narrow corridor with spine-like roots.
Treasure
Silvered dagger, Myconid cap that grants advantage on Wisdom saves once.
DM Notes
Use sensory descriptions; allow Intelligence saves to negate effects.
Sap-Lava Falls
DeadlySuggested Level: 6–8
Creatures
- 3 Sap Slimes
- 1 Root Chimera
Terrain Features
Muddy ground, rising sap-lava requiring DC 15 Dexterity climb checks.
Treasure
Crystal shard used in final ritual, 20 gp
DM Notes
Time pressure; if party lingers, sap-lava rises further.
Dais of Whispers
HardSuggested Level: 7–9
Creatures
- 1 Whispering Tendril
- 2 Root Ents
Terrain Features
Circular dais with rune-inscribed floors.
Treasure
Rune-etched seed key, 100 gp
DM Notes
Emphasize psychic threats; use Wisdom saves liberally.
Magic Items
Prism Globe of Daylight
RareLocation
Reward for Reclaim the Sapphire Prisms quest
Attunement
Yes, requires attuning by a cleric of the Garden God.
Elixir of Bloomborne Health
UncommonLocation
Faelind’s Glasshouse lab
Attunement
No
Iron Orchard Medallion
UncommonLocation
Reward for Salted Earth quest
Attunement
No
Elven Charms of Binding
RareLocation
Reward from Echoing Shrine alliance
Attunement
Yes, by an elf or druid.
Steam-Pump of Scalding
Very RareLocation
Commander Isla’s reserves in Drillship Bay
Attunement
No
God-Seed Sash
Very RareLocation
Shards of the God-Seed side quest
Attunement
Yes
Staff of Verdant Banishment
LegendaryLocation
Reward for Heart of the Garden (poison ending)
Attunement
Yes
Clockwork Golem Core
RareLocation
Faelind’s Glasshouse secret vault
Attunement
No
Crystal Seed Whistle
UncommonLocation
Tryst at Dusk quest reward
Attunement
No
Null-Bloom Codex
LegendaryLocation
Final prophecy in Shards of the God-Seed
Attunement
Yes, by a wizard or druid.
Player Characters
You need to register to create and view player characters in this campaign.
Register Now